|
Contents Page
|
| Viewing the Account Actions |
 |
You can view the
actions on an account by selecting the Action
folder in the left hand frame of the Account
Manager Screen.
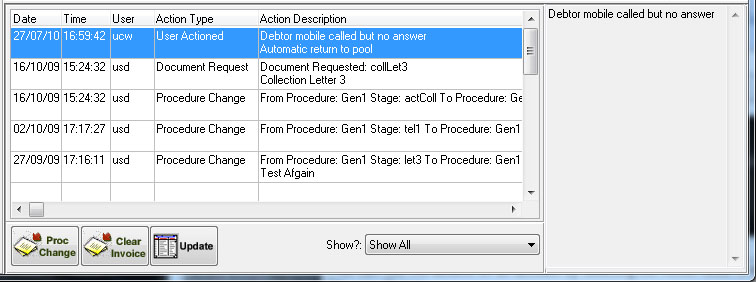
The details of any actions applied to the
account will display in the bottom frame as
shown below. The actions can be filtered
using the "Show?" drop down menu located below
the actions, with this you may filter using any
of the systems action types. You may sort
the actions by clicking on the column headers. |
|
 |
|
|
|
| |
| Creating an Account Action |
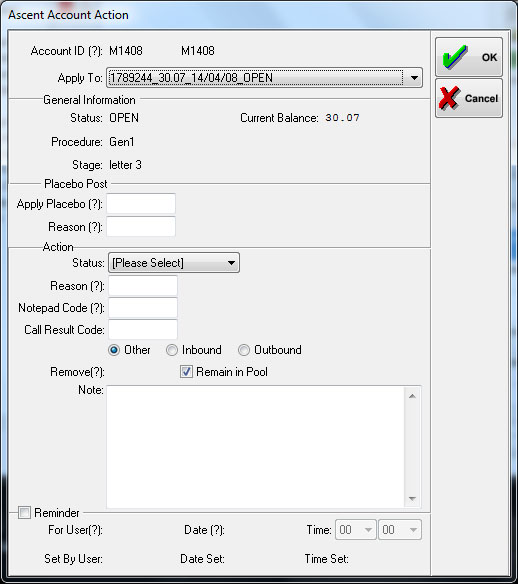
The Account Action
screen can be launched by clicking on the OK
button located at the top right hand side of the
Account Manager Screen. You can leave this
screen at any time by clicking the "CANCEL"
button.
The first setting you may define here is "Apply
To" where you will select the invoice you wish
to apply the action to. Generally there
will be only one invoice.
Placebo Post:
You may apply a
placebo stage to
the account here. Right click in the
"Apply Placebo?" box and select a
placebo post from the browse. You will
also be required to give a reason for this,
again right click in the "Reason?" box and
choose a reason from the browse. (see the Create
Placebo Stage section in the administration
manual).
Action:
You may select an invoice status to apply to the invoice
by clicking in the "Status" drop down box.
If you apply a new status to the account you
must also supply a reason for doing so.
The reason can be applied by right clicking in
the "Reason(?)" box and selecting a valid reason
from the browse. (For instruction on creating
status' and reasons please see the
administration manual.).
A notepad code can also be applied to the action
where you can right click in the "Notepad
Code(?)" box and select a relevant notepad code
from the browse. Most note pad codes will
pre fill a pre-defined message into the "Note"
area. (See the Create Notepad Code section in
the administration manual).
You can also place a specific
call result code on the action
as to the outcome of a call. By right
clicking in the "Call Result Code" box you may
select a relevant code from the browse.
Using the radio buttons below you can define the
direction of the call if it was inbound or
outbound.
Accounts can be removed from the
pools until a
specified date. To set this uncheck the
"Remain in Pool" box and right click in the
"Remove(?)" box to select a date for the account to
be removed until.
If you have selected a notepad code the "Note"
box may already be populated with text.
You can add text to this if you wish or create a
new message. |
 |
Reminder:
Reminders can be set on accounts by checking the
"Reminder" box. This will enable the boxes
below where you can set the details. The
user will be set to yourself as default, however
you can set who the reminder is for by right
clicking in the "For User(?)" box and select the
user from the browse. (The ability to set
reminders for other users can be toggled on and
off in the System Parameter Maintenance - See
the administration manual). A date can be
set by right clicking in the "Date(?)" box and
subsequently a time by using the drop down
"Time" boxes to the right. The information
below this will log who set the reminder, the
date and the time the reminder was set.
Set reminders will pop up to users when they are
working through pools (See Using Pools).
Click on the "OK" button to save your changes. |
|
| |
| Updating an Account Action |
| You may update an
account action by double clicking on the action
displayed on the Account Manager Screen or by selecting
the note and clicking on the "Update" button located
below the notes. You can
only update actions with the Action Type 'User Actioned'
(The ability to update notes can be configured in the
Group Maintenance - See the administration manual).
Only the note section can be updated on the action, all
other sections are un-editable. Click on the "OK"
button to save your changes. |
|
Contents Page
|