|
Contents Page
|
| Viewing the Account
Documents |
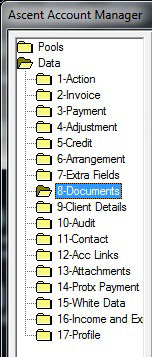 |
You can view the
documents on an account by selecting the
Documents
folder in the left hand frame of the Account
Manager Screen.
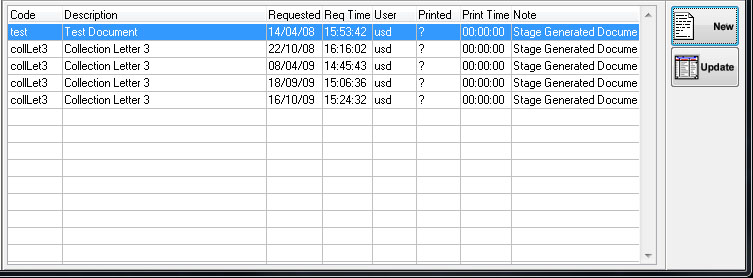
The details of any documents applied to the
account will display in the bottom frame as
shown below. The documents can be sorted by
clicking on the column headers. |
|
 |
|
| |
| Creating an Account
Document |
The Account
Documents screen can be launched by clicking on the
NEW
button located at the top right hand side of the
Documents browse. You may leave this screen
at any time by clicking the "CANCEL" button.
The first setting you may define here is "Apply
To" where you will select the invoice you wish
to apply the document to. Generally there
will be only one invoice.
By right clicking in the "Document
Code(?)" box you will be able so select a system
account document code from the browse.
The following drop down menu boxes can be used
to select the information you need for the
document based on the type of document you
require to generate. For example, if you
were looking to generate a Standing Order
Mandate you would select which arrangement you
require from the "Arrangement" box. If you
were looking to generate a payment receipt then
you would select the payment you require from
the "Payment" box. Similarly if it was a
document to notify an adjustment to an account
then you would select from the "Adjustment" box.
The "Settlement Percentage" box is defaulted to
the sub client settlement
figure. However this can be changed
to the figure you require. Changing this |
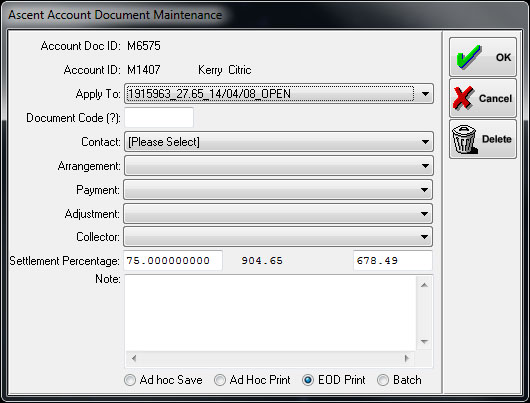 |
figure will
recalculate the settlement figure to the right
of the balance shown in this screen.
You may enter a note relating to this account
document if you wish in the "Note" box.
Finally you can select from the four radio
buttons at the bottom of the screen on how you
are wanting to handle the document. "Ad
hoc Save" will save the document to a directory
of your choice - useful if you are wanting to
email or just save the file. "Ad hoc
Print" will send the document to your machines
default printer. "EOD Print" will leave the
document to be printed during the systems
End of Day run.
"Batch" will allow you to view the documents in
the Batch Document
Maintenance for manipulation later.
Click on the "OK" button to save your changes
and carry out the actions you have selected. |
|
| |
| Updating / Deleting an
Account Document |
You may update an
account document by double clicking on the document displayed on the Account Manager Screen or by selecting
the document and clicking on the "UPDATE" button located
below the "NEW" button. All fields highlighted
above are editable in the update mode. Click on
the "OK" button to save your changes.
Simply delete the adjustment by clicking on the "DELETE"
button. |
|
Contents Page
|